Hello folks.
Today we're going to be learning about how to Create your own repository using Git and BitBucket.
In the next post, I will go over how to create a branch, make changes, and push the branch up to BitBucket.
What's Git Gui and how will it help you with development?
Git Gui will allow you to make changes to the repository by making new commits, amending existing ones, creating branches that handle the current changes / fixes you are focusing on, performing local merges of different branches, and fetching/pulling to remote repositories.
Let's begin by downloading Git Gui.
You can download Git Gui by going to the website https://git-scm.com/
For Windows PC's click the Download For Windows Button On the Right.

Follow the steps through the installation until you reach this window.
I recommend installing this feature because it allows you to right click a file and open Git Gui right away.

The download and installation has been completed. So, lets start Git Gui with and create a repository online using BitBucket from a file you have already created.
For this example, we will use Git Gui with BitBucket (Online Repository).
Make sure you have an account with BitBucket (https://bitbucket.org/)
Once you have created an account, navigate to here : https://bitbucket.org/repo/create

After you have clicked "Create Repository"
Navigate down to the "I have an existing project" click it, and read the Git Command it generates for you.
Keep that open and follow exactly what it tells you to do except input the directory you want to push to BitBucket.
You will have to now use Git Bash that downloaded with your Git-Scm installation. Simply navigate for it in your start menu and open it.
This is what it should look like.

Enter the details that were generated in the BitBucket website but use your own directory that you have your files in.
After you are finished, it should look like this.

You will likely not need to do the last 2 commands, however, I would recommend practicing them so you are familiar with bash. You will likely only need to use it one more time, if ever, for beginner portions of Git-Scm.
There is one more step before you have a fully functioning local and online repo connected to eachother.
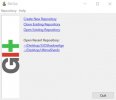
Right click your folder that you created the repository with and click Git Gui (assuming you clicked the Git Gui option during installation) otherwise, open Git Gui, click "Open Existing Repository", navigate to your folder, and select the folder.
You should now be seeing this.

When you load Git Gui, you may get a message to decompress the database, or unlock index, hit OK.
Follow the following steps to push your files up to the online repository.
Step 1: Staging Your Files For Committing
Click "Stage Changed". You'll receive a message to stage a bunch of untracked files. Click "Yes".
Allow some time for all the files to be staged (There's ALOT). If it asks you to Unlock Index, click "Unlock Index".
Step 2: Committing The Files
Enter a commit message in the white box on the bottom. It can be something generic for now, although in the future you want to be as thorough as possible, listing all the changes you have made. For now, we will just put "Setting Up Repository".
Your Git Gui window should look like this.

Click the "Commit" button. This will commit ALL the files into the current branch "Master". This should be the ONLY time you ever commit changes to master, unless you know what you are doing.
Step 3: Pushing The Branch Up To The Online Repository
Again, this should be the ONLY time you push the master branch unless you know what you are doing.
Click the "Push" button and click the branch master.
It will ask you for your password. Enter it.
Congratulations! You have now successfully created your first repository with BitBucket and Git.
Please visit my other thread explaining the ins and outs when using Git Gui. It is VERY simple to use!
(Future Thread Placeholder Here)
Today we're going to be learning about how to Create your own repository using Git and BitBucket.
In the next post, I will go over how to create a branch, make changes, and push the branch up to BitBucket.
What's Git Gui and how will it help you with development?
Git Gui will allow you to make changes to the repository by making new commits, amending existing ones, creating branches that handle the current changes / fixes you are focusing on, performing local merges of different branches, and fetching/pulling to remote repositories.
Let's begin by downloading Git Gui.
You can download Git Gui by going to the website https://git-scm.com/
For Windows PC's click the Download For Windows Button On the Right.
Follow the steps through the installation until you reach this window.
I recommend installing this feature because it allows you to right click a file and open Git Gui right away.
The download and installation has been completed. So, lets start Git Gui with and create a repository online using BitBucket from a file you have already created.
For this example, we will use Git Gui with BitBucket (Online Repository).
Make sure you have an account with BitBucket (https://bitbucket.org/)
Once you have created an account, navigate to here : https://bitbucket.org/repo/create
After you have clicked "Create Repository"
Navigate down to the "I have an existing project" click it, and read the Git Command it generates for you.
Keep that open and follow exactly what it tells you to do except input the directory you want to push to BitBucket.
You will have to now use Git Bash that downloaded with your Git-Scm installation. Simply navigate for it in your start menu and open it.
This is what it should look like.
Enter the details that were generated in the BitBucket website but use your own directory that you have your files in.
After you are finished, it should look like this.
You will likely not need to do the last 2 commands, however, I would recommend practicing them so you are familiar with bash. You will likely only need to use it one more time, if ever, for beginner portions of Git-Scm.
There is one more step before you have a fully functioning local and online repo connected to eachother.
Right click your folder that you created the repository with and click Git Gui (assuming you clicked the Git Gui option during installation) otherwise, open Git Gui, click "Open Existing Repository", navigate to your folder, and select the folder.
You should now be seeing this.
When you load Git Gui, you may get a message to decompress the database, or unlock index, hit OK.
Follow the following steps to push your files up to the online repository.
Step 1: Staging Your Files For Committing
Click "Stage Changed". You'll receive a message to stage a bunch of untracked files. Click "Yes".
Allow some time for all the files to be staged (There's ALOT). If it asks you to Unlock Index, click "Unlock Index".
Step 2: Committing The Files
Enter a commit message in the white box on the bottom. It can be something generic for now, although in the future you want to be as thorough as possible, listing all the changes you have made. For now, we will just put "Setting Up Repository".
Your Git Gui window should look like this.
Click the "Commit" button. This will commit ALL the files into the current branch "Master". This should be the ONLY time you ever commit changes to master, unless you know what you are doing.
Step 3: Pushing The Branch Up To The Online Repository
Again, this should be the ONLY time you push the master branch unless you know what you are doing.
Click the "Push" button and click the branch master.
It will ask you for your password. Enter it.
Congratulations! You have now successfully created your first repository with BitBucket and Git.
Please visit my other thread explaining the ins and outs when using Git Gui. It is VERY simple to use!
(Future Thread Placeholder Here)
Attachments

Last edited: