You are using an out of date browser. It may not display this or other websites correctly.
You should upgrade or use an alternative browser.
You should upgrade or use an alternative browser.
Resource icon
- Thread starter Toriad
- Start date
Hank
Everyone should watch this video tutorial. *two thumbs up* I've never been involved in the github before and this taught me so very much.
I love video tutorials. You did an excellent job making this.
Toriad - "pick an easier name bro"
I love video tutorials. You did an excellent job making this.
Toriad - "pick an easier name bro"
Last edited by a moderator:
Great video! This info from Atlassian really helped also!
Forking Workflow With Pull Requests
In the Forking Workflow, a developer pushes a completed feature to their own public repository instead of a shared one. After that, they file a pull request to let the project maintainer know that it’s ready for review.
The notification aspect of pull requests is particularly useful in this workflow because the project maintainer has no way of knowing when another developer has added commits to their Bitbucket repository.
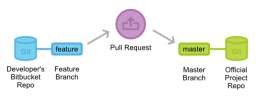
Since each developer has their own public repository, the pull request’s source repository will differ from its destination repository. The source repository is the developer’s public repository and the source branch is the one that contains the proposed changes. If the developer is trying to merge the feature into the main codebase, then the destination repository is the official project and the destination branch is master.
Pull requests can also be used to collaborate with other developers outside of the official project. For example, if a developer was working on a feature with a teammate, they could file a pull request using the teammate’s Bitbucket repository for the destination instead of the official project. They would then use the same feature branch for the source and destination branches.
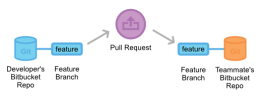
The two developers could discuss and develop the feature inside of the pull request. When they’re done, one of them would file another pull request asking to merge the feature into the official master branch. This kind of flexibility makes pull requests very powerful collaboration tool in the Forking workflow.
Example
The example below demonstrates how pull requests can be used in the Forking Workflow. It is equally applicable to developers working in small teams and to a third-party developer contributing to an open source project.
In the example, Mary is a developer, and John is the project maintainer. Both of them have their own public Bitbucket repositories, and John’s contains the official project.
Mary forks the official project
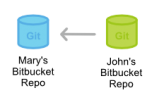
To start working in the project, Mary first needs to fork John’s Bitbucket repository. She can do this by signing in to Bitbucket, navigating to John’s repository, and clicking the Fork button.

After filling out the name and description for the forked repository, she will have a server-side copy of the project.
Mary clones her Bitbucket repository
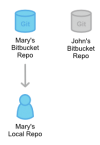
Next, Mary needs to clone the Bitbucket repository that she just forked. This will give her a working copy of the project on her local machine. She can do this by running the following command:
git clone https://[email protected]/user/repo.git
Keep in mind that git clone automatically creates an origin remote that points back to Mary’s forked repository.
Mary develops a new feature
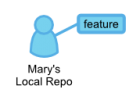
Before she starts writing any code, Mary needs to create a new branch for the feature. This branch is what she will use as the source branch of the pull request.
git checkout -b some-feature
# Edit some code
git commit -a -m "Add first draft of some feature"
Mary can use as many commits as she needs to create the feature. And, if the feature’s history is messier than she would like, she can use an interactive rebase to remove or squash unnecessary commits. For larger projects, cleaning up a feature’s history makes it much easier for the project maintainer to see what’s going on in the pull request.
Mary pushes the feature to her Bitbucket repository
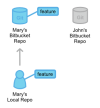
After her feature is complete, Mary pushes the feature branch to her own Bitbucket repository (not the official repository) with a simple git push:
git push origin some-branch
This makes her changes available to the project maintainer (or any collaborators who might need access to them).
Mary creates the pull request
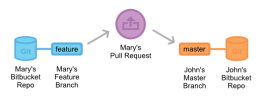
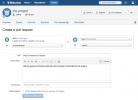
After Bitbucket has her feature branch, Mary can create the pull request through her Bitbucket account by navigating to her forked repository and clicking the Pull request button in the top-right corner. The resulting form automatically sets Mary’s repository as the source repository, and it asks her to specify the source branch, the destination repository, and the destination branch.
Mary wants to merge her feature into the main codebase, so the source branch is her feature branch, the destination repository is John’s public repository, and the destination branch is master. She’ll also need to provide a title and description for the pull request. If there are other people who need to approve the code besides John, she can enter them in the Reviewers field.
After she creates the pull request, a notification will be sent to John via his Bitbucket feed and (optionally) via email.
John reviews the pull request

John can access all of the pull requests people have filed by clicking on the Pull request tab in his own Bitbucket repository. Clicking on Mary’s pull request will show him a description of the pull request, the feature’s commit history, and a diff of all the changes it contains.
If he thinks the feature is ready to merge into the project, all he has to do is hit the Merge button to approve the pull request and merge Mary’s feature into his master branch.
But, for this example, let’s say John found a small bug in Mary’s code, and needs her to fix it before merging it in. He can either post a comment to the pull request as a whole, or he can select a specific commit in the feature’s history to comment on.
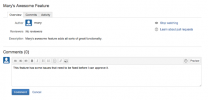
Mary adds a follow-up commit
If Mary has any questions about the feedback, she can respond inside of the pull request, treating it as a discussion forum for her feature.
To correct the error, Mary adds another commit to her feature branch and pushes it to her Bitbucket repository, just like she did the first time around. This commit is automatically added to the original pull request, and John can review the changes again, right next to his original comment.
John accepts the pull request
Finally, John accepts the changes, merges the feature branch into master, and closes the pull request. The feature is now integrated into the project, and any other developers working on it can pull it into their own local repositories using the standard git pull command.
Forking Workflow With Pull Requests
In the Forking Workflow, a developer pushes a completed feature to their own public repository instead of a shared one. After that, they file a pull request to let the project maintainer know that it’s ready for review.
The notification aspect of pull requests is particularly useful in this workflow because the project maintainer has no way of knowing when another developer has added commits to their Bitbucket repository.

Since each developer has their own public repository, the pull request’s source repository will differ from its destination repository. The source repository is the developer’s public repository and the source branch is the one that contains the proposed changes. If the developer is trying to merge the feature into the main codebase, then the destination repository is the official project and the destination branch is master.
Pull requests can also be used to collaborate with other developers outside of the official project. For example, if a developer was working on a feature with a teammate, they could file a pull request using the teammate’s Bitbucket repository for the destination instead of the official project. They would then use the same feature branch for the source and destination branches.

The two developers could discuss and develop the feature inside of the pull request. When they’re done, one of them would file another pull request asking to merge the feature into the official master branch. This kind of flexibility makes pull requests very powerful collaboration tool in the Forking workflow.
Example
The example below demonstrates how pull requests can be used in the Forking Workflow. It is equally applicable to developers working in small teams and to a third-party developer contributing to an open source project.
In the example, Mary is a developer, and John is the project maintainer. Both of them have their own public Bitbucket repositories, and John’s contains the official project.
Mary forks the official project

To start working in the project, Mary first needs to fork John’s Bitbucket repository. She can do this by signing in to Bitbucket, navigating to John’s repository, and clicking the Fork button.
After filling out the name and description for the forked repository, she will have a server-side copy of the project.
Mary clones her Bitbucket repository

Next, Mary needs to clone the Bitbucket repository that she just forked. This will give her a working copy of the project on her local machine. She can do this by running the following command:
git clone https://[email protected]/user/repo.git
Keep in mind that git clone automatically creates an origin remote that points back to Mary’s forked repository.
Mary develops a new feature

Before she starts writing any code, Mary needs to create a new branch for the feature. This branch is what she will use as the source branch of the pull request.
git checkout -b some-feature
# Edit some code
git commit -a -m "Add first draft of some feature"
Mary can use as many commits as she needs to create the feature. And, if the feature’s history is messier than she would like, she can use an interactive rebase to remove or squash unnecessary commits. For larger projects, cleaning up a feature’s history makes it much easier for the project maintainer to see what’s going on in the pull request.
Mary pushes the feature to her Bitbucket repository

After her feature is complete, Mary pushes the feature branch to her own Bitbucket repository (not the official repository) with a simple git push:
git push origin some-branch
This makes her changes available to the project maintainer (or any collaborators who might need access to them).
Mary creates the pull request

After Bitbucket has her feature branch, Mary can create the pull request through her Bitbucket account by navigating to her forked repository and clicking the Pull request button in the top-right corner. The resulting form automatically sets Mary’s repository as the source repository, and it asks her to specify the source branch, the destination repository, and the destination branch.
Mary wants to merge her feature into the main codebase, so the source branch is her feature branch, the destination repository is John’s public repository, and the destination branch is master. She’ll also need to provide a title and description for the pull request. If there are other people who need to approve the code besides John, she can enter them in the Reviewers field.

After she creates the pull request, a notification will be sent to John via his Bitbucket feed and (optionally) via email.
John reviews the pull request

John can access all of the pull requests people have filed by clicking on the Pull request tab in his own Bitbucket repository. Clicking on Mary’s pull request will show him a description of the pull request, the feature’s commit history, and a diff of all the changes it contains.
If he thinks the feature is ready to merge into the project, all he has to do is hit the Merge button to approve the pull request and merge Mary’s feature into his master branch.
But, for this example, let’s say John found a small bug in Mary’s code, and needs her to fix it before merging it in. He can either post a comment to the pull request as a whole, or he can select a specific commit in the feature’s history to comment on.

Mary adds a follow-up commit
If Mary has any questions about the feedback, she can respond inside of the pull request, treating it as a discussion forum for her feature.
To correct the error, Mary adds another commit to her feature branch and pushes it to her Bitbucket repository, just like she did the first time around. This commit is automatically added to the original pull request, and John can review the changes again, right next to his original comment.
John accepts the pull request
Finally, John accepts the changes, merges the feature branch into master, and closes the pull request. The feature is now integrated into the project, and any other developers working on it can pull it into their own local repositories using the standard git pull command.
Last edited:
Ok, so I created a pull, you added it and I'm ready to work on the next thing. However, Denjiki has made some more edits and my fork is only showing 180 commits but the main is showing 200 commits. Somehow I am behind but I have no idea what I need to do to update my local files. My sourcetree currently looks like this:
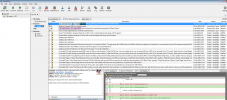

Nevermind, I think I got it by pushing to my origin.
Hank
Bump - This is useful and can help people. Let it not be forgotten by the servuo community.
Anyone can submit pull requests to the distro. ServUO is a community project. It's up to everyone in the community to help perfect it!
Anyone can submit pull requests to the distro. ServUO is a community project. It's up to everyone in the community to help perfect it!
