- Requirements
- UOFiddler
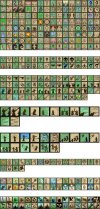
I've been working on a new UI for my shard, and just recently finished all of the spell icons (167 total). Unlike other icon sets, this one has the original OSI artwork intact, but some color has been added and the icons look more universal (similar backgrounds and frames). Below, you can see the new artwork next to the original:

In order from top to bottom:

Magery

Necro

Special Attacks

Bushido

Ninjitsu

Chivalry

Spellweaving

Mysticism
Installation:
Inside the main archive you will find 8 more archives that contain the BMPs for each set. All icons are named as the BMP they replace.
Open UOFiddler, and go to Gumps.
Scroll through the list and locate the first BMP to replace.
Right-click on the gump image and select Replace, and then navigate to the image to be used.
Rinse and repeat for all the icons you wish to replace. (It's optional which ones can be used.)
When finished, right-click on any of the gumps you replaced and select Save.
Copy the Gumpart.mul and Gumpidx.mul files into the Client file directory.
**For those needing the UOP files, just use UOFiddler to convert your UOP files to MUL and follow the steps above. At the last step, convert back to UOP in UOFiddler and copy the UOP files into the Client file directory.

In order from top to bottom:
Magery
Necro
Special Attacks
Bushido
Ninjitsu
Chivalry
Spellweaving
Mysticism
Installation:
Inside the main archive you will find 8 more archives that contain the BMPs for each set. All icons are named as the BMP they replace.
Open UOFiddler, and go to Gumps.
Scroll through the list and locate the first BMP to replace.
Right-click on the gump image and select Replace, and then navigate to the image to be used.
Rinse and repeat for all the icons you wish to replace. (It's optional which ones can be used.)
When finished, right-click on any of the gumps you replaced and select Save.
Copy the Gumpart.mul and Gumpidx.mul files into the Client file directory.
**For those needing the UOP files, just use UOFiddler to convert your UOP files to MUL and follow the steps above. At the last step, convert back to UOP in UOFiddler and copy the UOP files into the Client file directory.
