This is Bulkuo which was provided to me by "punt". He hooked it up man you guys will love this trust me... ") Oh yeah also btw you need to get COLORWORKS its the best batch photo processor that I've seen.
Oh yeah also btw you need to get COLORWORKS its the best batch photo processor that I've seen.
This program is controlled through the command line. You have to open CMD as administrator for this to work...
Anyways so lets get down to the steps...
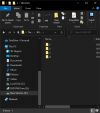
1. Create a folder in your C drive named "BULKUO"
2. Add folders 1,2,3,4 to the "BULKUO" folder
it should look like this...

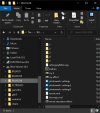
3. Now drag in Bulkuo.exe, artLegacyMUL.uop, texidx.mul, texmaps.mul
it should look like this...

4. Now you need to extract the art and textures to folders 1 and 2.... To do this you need to open CMD as Administrator... Navigate to "G:\" simply by typing "G:" or if you're using the "C:\ drive" don't worry about it.
5. Now navigate to the "BULKUO" folder... Just type in "cd bulkuo"
6. Now run the following commands...
.\bulkuo --extract --art 1 artLegacyMul.uop
.\bulkuo --extract --texture 2 texmaps.mul texidx.mul
Type them in just as they are once in the bulkuo folder and they should extract all art and textures within a minute or two.
7. Now load up COLORWORKS (You need the pro edition for bulk processing) and load about 10k pictures... I have a 6 core cpu and 16 gb ram so I ran into crashes around 15-20k pictures at a time. So start with folder "1" and process your art to taste. It's wise to create screen shot backups of your effect settings so you can apply identical effect to your other batches of photos. Apply the effects to folder 2 also which is the textures and theres not that many so you can do them all at once.
Remember to save all custom ART to folder "3" and all custom TEXTURES to folder "4"
8. Now that you have your folders with images that have effects applied simple use the following commands to import the images into the art uop and the texture muls.
.\bulkuo --create --art 3 artLegacyMul.uop
.\bulkuo --create --texture 4 texmaps.mul texidx.mul
9. Drop the new artLegacyMUL.uop, texidx.mul, texmaps.mul into your client uo files overwriting the existing and boom you just changed the way the game looks.
TIP: If you plan on making many effects please see the following picture for workflow tips... You can see there is a folder 5 which contains the original UO FILES (artLegacyMUL.uop, texidx.mul, texmaps.mul). When you finally create an effect zip up the "artLegacyMUL.uop, texidx.mul, texmaps.mul" files and name it to your effect. Also save the screen shot of you effect settings in there too it should look like this.

Oh yeah also btw you need to get COLORWORKS its the best batch photo processor that I've seen.This program is controlled through the command line. You have to open CMD as administrator for this to work...
Anyways so lets get down to the steps...
1. Create a folder in your C drive named "BULKUO"
2. Add folders 1,2,3,4 to the "BULKUO" folder
it should look like this...
3. Now drag in Bulkuo.exe, artLegacyMUL.uop, texidx.mul, texmaps.mul
it should look like this...
4. Now you need to extract the art and textures to folders 1 and 2.... To do this you need to open CMD as Administrator... Navigate to "G:\" simply by typing "G:" or if you're using the "C:\ drive" don't worry about it.
5. Now navigate to the "BULKUO" folder... Just type in "cd bulkuo"
6. Now run the following commands...
.\bulkuo --extract --art 1 artLegacyMul.uop
.\bulkuo --extract --texture 2 texmaps.mul texidx.mul
Type them in just as they are once in the bulkuo folder and they should extract all art and textures within a minute or two.
7. Now load up COLORWORKS (You need the pro edition for bulk processing) and load about 10k pictures... I have a 6 core cpu and 16 gb ram so I ran into crashes around 15-20k pictures at a time. So start with folder "1" and process your art to taste. It's wise to create screen shot backups of your effect settings so you can apply identical effect to your other batches of photos. Apply the effects to folder 2 also which is the textures and theres not that many so you can do them all at once.
Remember to save all custom ART to folder "3" and all custom TEXTURES to folder "4"
8. Now that you have your folders with images that have effects applied simple use the following commands to import the images into the art uop and the texture muls.
.\bulkuo --create --art 3 artLegacyMul.uop
.\bulkuo --create --texture 4 texmaps.mul texidx.mul
9. Drop the new artLegacyMUL.uop, texidx.mul, texmaps.mul into your client uo files overwriting the existing and boom you just changed the way the game looks.
TIP: If you plan on making many effects please see the following picture for workflow tips... You can see there is a folder 5 which contains the original UO FILES (artLegacyMUL.uop, texidx.mul, texmaps.mul). When you finally create an effect zip up the "artLegacyMUL.uop, texidx.mul, texmaps.mul" files and name it to your effect. Also save the screen shot of you effect settings in there too it should look like this.