tass23 created a new tutorial:
XmlDialog/XmlEdit, XmlQuestNPC, KILLNAMED Objective, XmlMobFactions
XmlDialog/XmlEdit, XmlQuestNPC, KILLNAMED Objective, XmlMobFactions
Feature Usage: XmlDialog/XmlEdit, XmlQuestNPC, KILLNAMED Objective, XmlMobFactions
Estimated Completion Time: ~60:00 minutes (give or take copy/paste speed)
Introduction: Create and use: an XmlQuestNPC, Specific Quest Mob(s), XmlMobFaction features, and more.
There are a lot of different ways to spawn mobs using Xmlspawner. You can change a lot "on the fly" that you can't change easily using a script (unless restarting the server a lot is fun for you). A script must be compiled and ready to be generated in the world, but something created from an Xmlspawner happens as soon as you click Respawn in the Spawner gump. While everything starts off as a script at some point, Xmlspawner can expand on it. We are going to build our Grey Wolf for the quest we created in the previous tutorial (XmlDialog/XmlEdit, XmlQuestNPC, KILL Objective Part 1). Here is the GIVE action as a quick reminder: (see image 1-0)

Image 1-0
Take special note of: Objective1 (KILL,greywolf,1) and Description1(Kill a wolf prowling the fields.). They go hand in hand.
Now there isn't a whole lot that is special about a wolf, we're going to fix that. Let's start with a basic spawn entry.
[Add Xmlspawner and target the ground near you, then double-click the Xmlspawner to open the window. There's a lot to look at here. I'll cover the important things we'll be using just for this tutorial. More advanced tutorials will cover more settings. Taking a closer look at the Xmlspawner window, here is a breakdown of what the numbers are highlighting (see image 1-1).
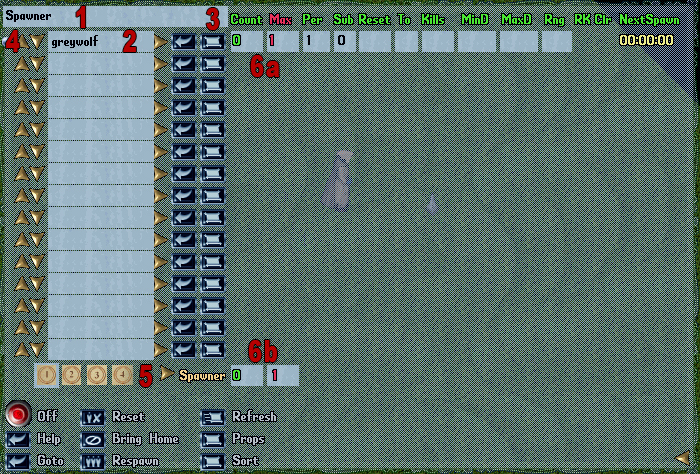
Image 1-1
1. Spawner Name - Xmlspawners can have unique names or you can just leave them their default (Spawner). I try to name mine whatever I'm using it for, in this case spawning a grey wolf for our Simple Quest. NOTE: DO NOT USE SPACES IN SPAWNER NAMES, USE "_" INSTEAD. Xmlspawner doesn't like spaces in spawner names, so use the underscore "_". This will be crucial later when we reference a spawner from a line entry on another spawner. You can use the Serial as well (which is great until you have to move the spawners to another shard, then everything breaks).
2. Line entry for the object to spawn - This can also be used to various Xmlspawner commands. For example, we could skip the XmlQuestNPC altogether, and have the quest gump appear when a player gets close enough to this spawner, but we'll talk more about that at a later date.
3. Book Entry - This opens a long book for you to enter commands or objects to be spawned. Each book is 26 pages long.
4. Lock/Unlock button - While hard to see in the picture, the small button to the very left of a line entry is for locking/unlocking that entry. This is helpful if you don't want that line messed. While anyone that can access a spawner can simply open the spawner and unlock the line to make changes, it is a good practice to get in to.
5. Up/Down arrows - These buttons control how many Max Spawns you have for that line entry. In this case, we're only going to spawn one grey wolf, so we will leave those arrows alone for now.
6a. Max Spawn - The red "1" indicates this line entry will spawn only "1" Max before it resets and the Min/Max timers for respawn take over. The green "0" indicates that 0 out of 1 max "whatever" have been spawned.
6b. Max Spawns - This red "1" tells you the total (Max Spawns) spawns that will be executed. This number will increase/decrease if you use the Up/Down arrows to the left of each line entry. There are instances where you would manually change this number instead of using the Up/Down arrows. Since we're only dealing with one spawn, there is no need to manually change the number. If we added another line entry for say a darkwolf, the Max Spawns would automatically increase/decrease as the Up/Down arrows were used.
7. Page Number - Yes, Page Number. If you don't think 15 line entries will be enough, simply click the page number to move to the next blank page of line entries. This means you can have 4 pages of individual line entries, each with 15 lines, that's a total of 60 individual line entries, per spawner.
You're probably wondering why I didn't explain the rest of the boxes in the far right of the spawner gump. With various entries, you can dramatically change the way spawns happen and what happens after the Max Spawn are reached for that line entry or even how many of "each mob you have to kill to advance to the next line entry" for example. For the purposes of this tutorial, the explanations for these will be saved for a future tutorial. The buttons along the bottom of the spawner gump are fairly straightforward.
On/Off Indicator - Left top. If the spawner is Active, this will be green, otherwise it's red.
Help - Left Middle. This opens another gump with syntax for using KEYWORDS and various other Xmlspawner settings.
GoTo - Left bottom. This will pull your character to the location of the Xmlspawner itself. This can be helpful, most times. However, there is very little reason to ever GoTo a spawner, because with the spawner gump open, you can make changes no matter where you are on the shard. Combined with [XmlFind, you can edit the [props of any spawner as well as open the spawner gumps, all without ever using GoTo.
Reset - Middle top. This will reset the spawner back to line entry 1 and turn the spawner Off.
Bring Home - Middle middle. This button will bring ALL the spawn back to the spawner itself. Helpful if you had once turned Home Range off and your mob wandered all across the land and got lost.
Respawn - Middle bottom. This button will Activate the spawner. In most cases the spawner will just do a soft reset, a reset without turning off, and spawn the first line entry. Sometimes the spawner doesn't fully re-cycle, so the Respawn just Activates the spawner wherever it "left off".
Refresh - Right top. If you've made changes to the [props or spawner settings, you can click Refresh to update the gump. In most cases, if you click out of one box and into another, the gump updates.
Props - Right middle. This opens the gump for the spawner's properties. There are even more settings that can be changed in the [props to alter the way spawning behaves.
Sort - Right bottom. This button can be very handy when you're using Sub-groups. Sub-groups allow you to Group line entries, so multiple line entries will spawn together. More on Sub-groups in a later tutorial.
So far, our spawner entry looks pretty plain:
But, if we click on the Book Entry icon (that is #3 in the list above), we can add even more to our greywolf. Any additional information you include about this particular spawn will override whatever the scripted value is. Otherwise, all default scripted values are inherited. So, for example, we will say that a regular greywolf is too weak and this one should be a lot tougher. First thing to change would be the Strength. So we change the line entry to read: (see image 1-2)
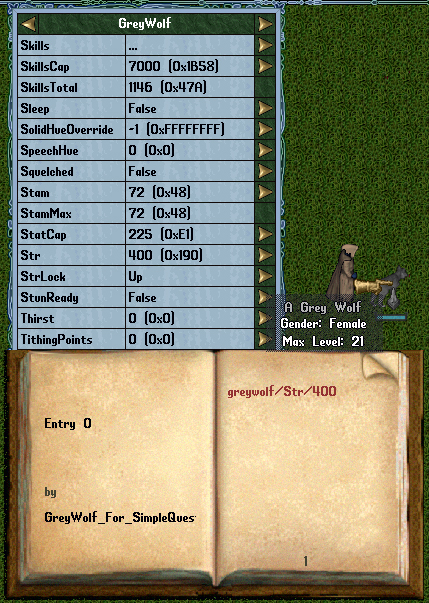
Image 1-2
Now just for the sake of argument, we'll assume you want to change the Hue to make our wolf stand out in the crowd. In this case, we'll use Hue 34, which is a reddish hue. (see image 1-3)
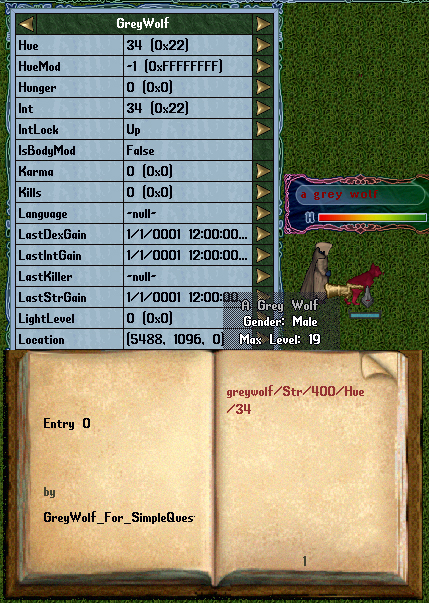
Image 1-3
Now let us also assume you want this mob to spawn as a "Red"/Murderer. On my shard, 5 Kills make you a "Red"/Murderer, so we simply add: (see image 1-4)
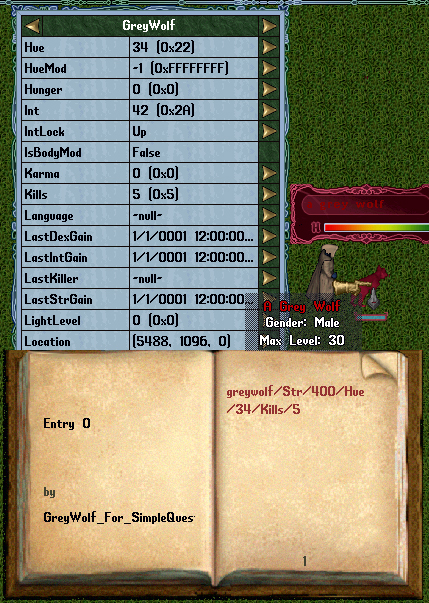
Image 1-4
Even with a Strength of 400, this greywolf needs more Hit Points. We can change the HitsMaxSeed which will increase the Max Hit Points the mob can have, but they will spawn with whatever the default health is in the script and "heal" up to their new Max: (see image 1-5)
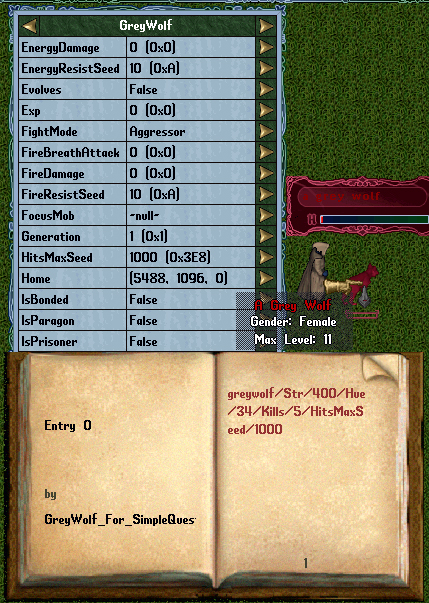
Image 1-5
Since that only increased the Max Hit Points, but spawned the greywolf with only the default health, we will make another change so that it spawns with the Max Hit Points, by increasing the Hits: (see image 1-6)
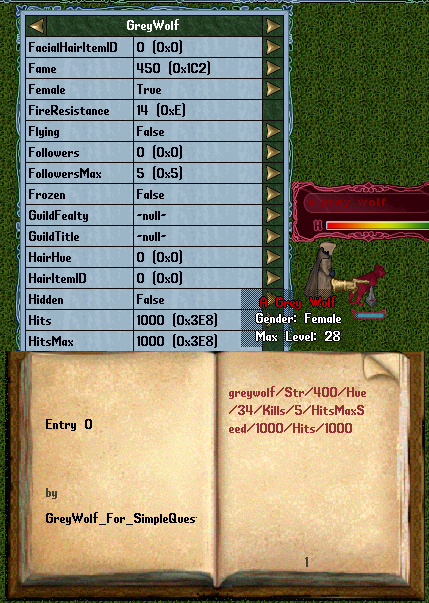
Image 1-6
Finally, we want to make our greywolf feel even more special. So we're going to give him a Name and a Title: (see image 1-7)
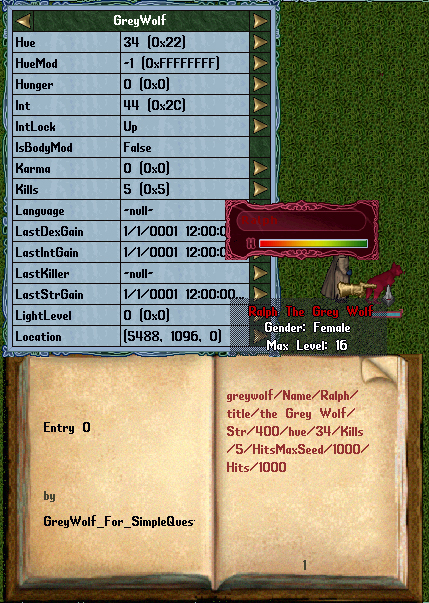
Image 1-7
Note: You may have noticed I didn't put the Name and Title at the end of the code like I did with the rest. When it comes to creating mobs on the fly using Xmlspawner, it helps to maintain a structure. I always start with the BaseClass, then Name, then Title, etc. Names and Titles are usually common changes, especially when working with KILL and KILLNAMED keywords in quests.
Code:
GIVE/<questholder/Name/A Simple Quest/titlestring/A Simple Quest/Notestring/Kill the wolf that has been eating my sheep./Objective1/KILL,greywolf,1/Description1/Kill a wolf prowling the fields./Addjournalentry/You should look in the following places:Brit Farms/PartyEnabled/True/Autoreward/True/CanSeeReward/False/Difficulty/2/Rewardstring/@bag/ADD/Gold,500/ADD/Lantern>Image 1-0
Take special note of: Objective1 (KILL,greywolf,1) and Description1(Kill a wolf prowling the fields.). They go hand in hand.
Now there isn't a whole lot that is special about a wolf, we're going to fix that. Let's start with a basic spawn entry.
[Add Xmlspawner and target the ground near you, then double-click the Xmlspawner to open the window. There's a lot to look at here. I'll cover the important things we'll be using just for this tutorial. More advanced tutorials will cover more settings. Taking a closer look at the Xmlspawner window, here is a breakdown of what the numbers are highlighting (see image 1-1).
Image 1-1
1. Spawner Name - Xmlspawners can have unique names or you can just leave them their default (Spawner). I try to name mine whatever I'm using it for, in this case spawning a grey wolf for our Simple Quest. NOTE: DO NOT USE SPACES IN SPAWNER NAMES, USE "_" INSTEAD. Xmlspawner doesn't like spaces in spawner names, so use the underscore "_". This will be crucial later when we reference a spawner from a line entry on another spawner. You can use the Serial as well (which is great until you have to move the spawners to another shard, then everything breaks).
2. Line entry for the object to spawn - This can also be used to various Xmlspawner commands. For example, we could skip the XmlQuestNPC altogether, and have the quest gump appear when a player gets close enough to this spawner, but we'll talk more about that at a later date.
3. Book Entry - This opens a long book for you to enter commands or objects to be spawned. Each book is 26 pages long.
4. Lock/Unlock button - While hard to see in the picture, the small button to the very left of a line entry is for locking/unlocking that entry. This is helpful if you don't want that line messed. While anyone that can access a spawner can simply open the spawner and unlock the line to make changes, it is a good practice to get in to.
5. Up/Down arrows - These buttons control how many Max Spawns you have for that line entry. In this case, we're only going to spawn one grey wolf, so we will leave those arrows alone for now.
6a. Max Spawn - The red "1" indicates this line entry will spawn only "1" Max before it resets and the Min/Max timers for respawn take over. The green "0" indicates that 0 out of 1 max "whatever" have been spawned.
6b. Max Spawns - This red "1" tells you the total (Max Spawns) spawns that will be executed. This number will increase/decrease if you use the Up/Down arrows to the left of each line entry. There are instances where you would manually change this number instead of using the Up/Down arrows. Since we're only dealing with one spawn, there is no need to manually change the number. If we added another line entry for say a darkwolf, the Max Spawns would automatically increase/decrease as the Up/Down arrows were used.
7. Page Number - Yes, Page Number. If you don't think 15 line entries will be enough, simply click the page number to move to the next blank page of line entries. This means you can have 4 pages of individual line entries, each with 15 lines, that's a total of 60 individual line entries, per spawner.
You're probably wondering why I didn't explain the rest of the boxes in the far right of the spawner gump. With various entries, you can dramatically change the way spawns happen and what happens after the Max Spawn are reached for that line entry or even how many of "each mob you have to kill to advance to the next line entry" for example. For the purposes of this tutorial, the explanations for these will be saved for a future tutorial. The buttons along the bottom of the spawner gump are fairly straightforward.
On/Off Indicator - Left top. If the spawner is Active, this will be green, otherwise it's red.
Help - Left Middle. This opens another gump with syntax for using KEYWORDS and various other Xmlspawner settings.
GoTo - Left bottom. This will pull your character to the location of the Xmlspawner itself. This can be helpful, most times. However, there is very little reason to ever GoTo a spawner, because with the spawner gump open, you can make changes no matter where you are on the shard. Combined with [XmlFind, you can edit the [props of any spawner as well as open the spawner gumps, all without ever using GoTo.
Reset - Middle top. This will reset the spawner back to line entry 1 and turn the spawner Off.
Bring Home - Middle middle. This button will bring ALL the spawn back to the spawner itself. Helpful if you had once turned Home Range off and your mob wandered all across the land and got lost.
Respawn - Middle bottom. This button will Activate the spawner. In most cases the spawner will just do a soft reset, a reset without turning off, and spawn the first line entry. Sometimes the spawner doesn't fully re-cycle, so the Respawn just Activates the spawner wherever it "left off".
Refresh - Right top. If you've made changes to the [props or spawner settings, you can click Refresh to update the gump. In most cases, if you click out of one box and into another, the gump updates.
Props - Right middle. This opens the gump for the spawner's properties. There are even more settings that can be changed in the [props to alter the way spawning behaves.
Sort - Right bottom. This button can be very handy when you're using Sub-groups. Sub-groups allow you to Group line entries, so multiple line entries will spawn together. More on Sub-groups in a later tutorial.
So far, our spawner entry looks pretty plain:
Code:
greywolfBut, if we click on the Book Entry icon (that is #3 in the list above), we can add even more to our greywolf. Any additional information you include about this particular spawn will override whatever the scripted value is. Otherwise, all default scripted values are inherited. So, for example, we will say that a regular greywolf is too weak and this one should be a lot tougher. First thing to change would be the Strength. So we change the line entry to read: (see image 1-2)
Code:
greywolf/Str/400/Image 1-2
Now just for the sake of argument, we'll assume you want to change the Hue to make our wolf stand out in the crowd. In this case, we'll use Hue 34, which is a reddish hue. (see image 1-3)
Code:
greywolf/Str/400/Hue/34/Image 1-3
Now let us also assume you want this mob to spawn as a "Red"/Murderer. On my shard, 5 Kills make you a "Red"/Murderer, so we simply add: (see image 1-4)
Code:
greywolf/Str/400/Hue/34/Kills/5/Image 1-4
Even with a Strength of 400, this greywolf needs more Hit Points. We can change the HitsMaxSeed which will increase the Max Hit Points the mob can have, but they will spawn with whatever the default health is in the script and "heal" up to their new Max: (see image 1-5)
Code:
greywolf/Str/400/Hue/34/Kills/5/HitsMaxSeed/1000Image 1-5
Since that only increased the Max Hit Points, but spawned the greywolf with only the default health, we will make another change so that it spawns with the Max Hit Points, by increasing the Hits: (see image 1-6)
Code:
greywolf/Str/400/Hue/34/Kills/5/HitsMaxSeed/1000/Hits/1000/Image 1-6
Finally, we want to make our greywolf feel even more special. So we're going to give him a Name and a Title: (see image 1-7)
Code:
greywolf/Name/Ralph/Title/the Grey Wolf/Str/400/Hue/34/Kills/5/HitsMaxSeed/1000/Hits/1000/Image 1-7
Note: You may have noticed I didn't put the Name and Title at the end of the code like I did with the rest. When it comes to creating mobs on the fly using Xmlspawner, it helps to maintain a structure. I always start with the BaseClass, then Name, then Title, etc. Names and Titles are usually common changes, especially when working with KILL and KILLNAMED keywords in quests.
Last edited:
") I've done pretty good up until this part:
I've done pretty good up until this part: